Selections
allow you to modify a defined area of an image instead of
the whole image. You can identify a selection by the
dashed blinking line called the marquee. Paint Shop Pro
has 3 basic tools designed for just about any type of
selection you might have in mind. In addition there is
another method that can be used in Paint Shop Pro 6 &
7 using vectors.
Some required terms you
will need to understand.
Marquee is the
black and white dashed line surrounding a
selection. It is also referred to as 'marching
ants'.
Feather set the
sharpness of a selection's edges by fading a set
width in pixels along the edge. It helps to blend
a selection into another image. The
higher the value used the softer the transition.
Antialias is
similar to feather but more precise. It produces
a smooth edge by partially filling in pixels
along the edge, making them semi traparent. It
will help stop the 'jaggies'
Sample Merged
when checked will select all layers and when un-checked
will select from the active layer only.
Match Mode
makes a selection based on either the
RGB, hue, brightness or all pixels. All pixels
will not select transparent areas.
Tolerance
controls how similar pixels have to be based on
the match mode settings before they are selected.
The Tools
The Selection Tool
will select precise shapes, they are square,
rectangle. circle and elliptical. It also has
settings for feather, antialias and sample merged
on the control palette.
The Freehand Tool
will select irregular shapes with a freehand,
smart edge, and point to point methods. It also
has settings for feather, antialias and sample
merged on the control palette.
The Wand Tool
will make selections based on color, hue or
brightness. The control palette for the wand has
match mode, tolerance and feather options the
control palette.
The Mover Tool will
allow you to move the marquee. To do this just
hold down the right mouse button inside the
marquee and drag the marquee where you want it,
then release the right mouse button.
Note: Both feather and antialias
must be set before the selection is made. By
holding down the shift key you are able to add a
new selection to an existing one. If you hold
down the Control key it will allow you to remove
a new selection from an existing selection.
You can perform any of the
functions listed in the edit menu options to a selection
or layer. Keep in mind that your copied selection will be
placed in a rectangular area regardless of its shape.
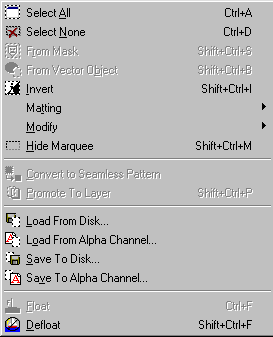
The Selection Menu
Select All and Select
None do just that they either select the
complete image or turn off all selections.
From
Mask will allow you to select the
active portion of a mask. Click
on From Mask to see the Mask Method tutorial.
From Vector Object*
PSP 7 only
Invert will change from the
initial selection to its surrounding area.
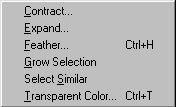
Modify allows for the following
functions as shown below.
Contract will
shrink a selection by a number of pixels you pick.
Expand will
expand a selection by a number of pixels you pick.
Feather
- see explanation above.
Grow
Selection expands a selection to include
adjacent areas of a similar color using the
wand's tolerance settings.
Select
Similar will select all colors that fall
in the range of the wand's tolerance settings.
Transparent
Color will remove areas from a selection
of a specific color. The areas are set to
transparent.
Matting is used
to remove extra pixels surrounding the border of
a selection when it is moved. This is really
necessary when the selection has been feathered
or anti-aliased. Layers can also be matted as
well as selections. This option will only be
available on a floating layer or selection and in
24 bit of grey scale modes. It has the following
options as shown below.
Defringe - will
bleed non-feathered pixels in the selection
outward and over the "jaggies" in the
feathered parts of the selection. This is used
when the selection is made on a colored
background. You will also have an option to
select the width of the defringe option. Remove Black Matte/Remove White Matte
- This is used when you copy and paste an anti-aliased
or feathered selection from a black or white
background and paste it to a colored background.
The black matte will remove the black pixels and
the white matte will remove the white pixels.
Hide Marquee
turns the blinking edge off or on. When it is
hidden it is still in effect. Convert to Seamless Pattern is
used to make a rectangular selection into a new
seamless pattern image. It will use the area
around the selection to eliminate the appearance
of seams. If the selection is too close to the
edge of the image you will receive an error
message and have to select a smaller area or one
more centered. You will then need to choose the
command again. Promote to Layer will move a
copy of your current selection to a new layer and
the orginal layer is not affected. Load/Save to Disk or Alpha Channels
- you can save a selection to a disk file or an
alpha channel. If you save to disk you can use
the selection in another image as well as the
image you are working on by loading it back from
the disk file. If you choose an alpha channel and
save your image as a psp file the saved selection
will be saved as well and can be loaded back from
the alpha channel. Float/Defloat a floating
selection temporarily rests above the image or
layer and can be modified without changing the
original image or selection.
In addition to all of the previous
methods Paint Shop Pro 6 introduced vector tools which
can also be used to make selections with. I've added a
tutorial on doing selections using these methods. Click here to see
this tutorial.
Additional Notes: Selection of a
part of an image is not limited to these tools as there
are other methods such as masks to also remove or select
a portion of an image. I highly recommend that you make
these and other Paint Shop Pro 5/6 functions part of your
normal tool box for graphics editing.
Reposted by permission of Joe Cilinceon, April
2002