Here are some
examples using the different Selection Tools on an image
 This was done using the selection tools and
shift key/control key. These tools can be used to make
all kinds of photo edge effects, buttons or just fun
shapes. This was done using the selection tools and
shift key/control key. These tools can be used to make
all kinds of photo edge effects, buttons or just fun
shapes.
-
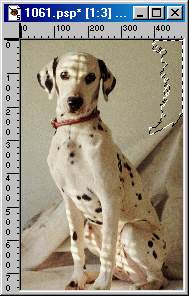
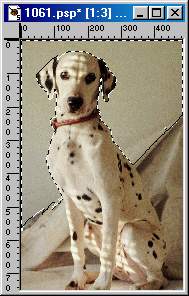
 The
freehand tools are best used on complicated
images or very busy backgrounds. I used the
combination of freehand, smart edge and point to
point to cut the dog out with. You just need to
remember the real secret to doing this kind of
stuff is patience and the shift-key/control-key. The
freehand tools are best used on complicated
images or very busy backgrounds. I used the
combination of freehand, smart edge and point to
point to cut the dog out with. You just need to
remember the real secret to doing this kind of
stuff is patience and the shift-key/control-key.- Here are some notes about the 3 tools that make
up the freehand selection tools
-
- Freehand - You must keep the
left mouse button depressed in order to continue
a selection. If you don't the ends will close and
you will get a straight marquee line from the
first point to the last point. You can continue
the selection by holding down the shift key and
picking up where you left off
- Smart Edge - Is great when you
want to select the border between 2 contrasting
colors. It is however not very good if the colors
are close.
Point to Point - is really my
personal favorite as I've found that you can
enlarge the image and work in small steps and get
really precise selections. It is also very good
for making a quick selection around an irregular
shaped object.
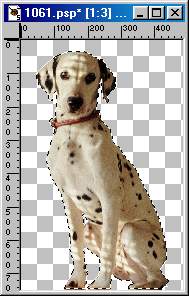
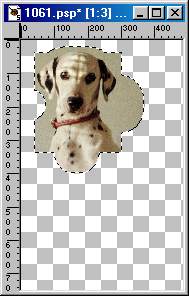
 The wand works great if you have
large areas that are similar in appearance such as the
background in the dog image or an image like the sky. You
can also try the Selections | Modify | Select Similar to
do the same as multiple selections. The wand works great if you have
large areas that are similar in appearance such as the
background in the dog image or an image like the sky. You
can also try the Selections | Modify | Select Similar to
do the same as multiple selections.
 |
 |
| This
was the first selection with the Tolerance set to
10. |
This
was made with several selections and the shift
key depressed. |
|