

|
|
|
|
Blade Pro Lesson TwoApplying Presets, and the Bevel Settings Here I am again, mo fun, mo fun... We ended the first lesson with Blade Pro installed, and your PSP plugins folder configured .You should be able to load the filter now and look at this elegant but somewhat intimidating interface. I have now added these attractive red numerals to guide you in your use of this filter. Okay, you can see all those numbers, right? That's big enough for you? (Hey, it's a thumbnail version, click on the image and you'll get a full size one to view or print out for reference!) There will be a 100 question quiz at the end of the lesson, please memorize them now.
JUST KIDDING, it's only 50 questions. |
|
|
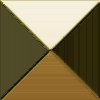
But seriously... let's begin by making a simple beveled gold button like THIS -
Open a 100x100 pixel image, 16 million colors, white background. Since we are going to use the whole image to make the button, it's not necessary to select any areas within it. However, sometimes you may need to apply the filter to only certain portions of the image, and you would make your selection first before loading Blade Pro.
Go to Effects/ Plugin Filters/ Flaming Pear/Super Blade Pro
(or Blade Pro if that's what you are using) At this point you will have the interface open, similar to the
picture above (only with no garish red numbers blocking your view!)
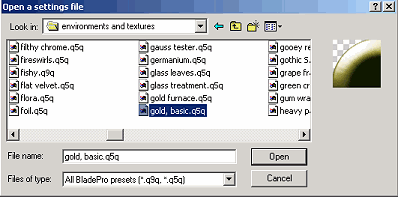
If you do not see the folder named "environments and textures" in the Look in box, navigate to that folder, it's inside your Blade Pro folder. Actually, on my computer, I have copied this folder and put it on the Desktop because it is a little easier to navigate to there. Once you find the "environments and textures" folder, you will see a number of files listed with the extension .q5q, or .q9q in the case of Blade Pro. These are the Super Blade Pro preset files, and these are the little buggers which will give you all the groovy effects (well most of the little buggers, there are also some bitmaps that are important too, but we will get to those!) Navigate to the file called "gold, basic.q5q" and highlight it. That name will appear in the File Name box now, and you can click on the Open button. The preset will now be applied to your 100x100 image in the preview window (#7 on your numbered interface) on the right side of the Blade Pro interface. If you like what you see, hit OK and the interface will close, and your new button will be a nice beveled gold button like above. Almost all of the preset effects within Blade Pro are extremely variable based on background color, shape, size, etc, meaning that if any of those variables change from image to image, the filter effect may be different. Here are some examples of different images, all using the same basic gold preset.
|
||
|
|
|||
|
|
|
|
||
| > | ||
|
|
|
|
Please join us at LVS Online for the best in online education. Filter Frenzy classes focus on Photoshop-compatible plugins. Xara X is taught by Ron Lacey and myself, and the rest of the 45+ classes are terrific, as well. We add new classes every session, so if we don't yet offer a class in something you want, keep watching, or better yet, email a suggestion to questions@lvsonline.com!

© Sally Beacham and Dizteq.com 1999-2002
)


 100x100 black fill (no visible difference)
 Davy's Dingbat "m"

 Again, if you like what you see in the preview window, hit OK
 This is
the 8th choice down, similar to #7, but the inner bevel is more
cushion-shaped.
This is
the 8th choice down, similar to #7, but the inner bevel is more
cushion-shaped.  same button, Radius 10
 same
button, Radius 150
same
button, Radius 150 same button, Height
-70
same button, Height
-70  same button,
Height 80
same button,
Height 80