|
|
|
|
|
|
|
|
|
|
|
|
|
|
| Spheroid Designer allows you to make bubbles,
balls, globes, spheres - in smooth or bump-mapped textures, with shiny or
matte highlights. You can use the preset spheres or make your own
designs, and save those as presets too!
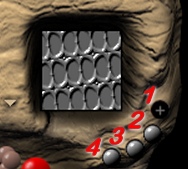
Let's begin by setting up an image to become a sphere. Using the image editor of your choice, open a non-transparent image with equal height and width (commonly known as a SQUARE, hehehehe.) Spheroid designer needs a perfectly square image or selection in order to make a sphere, if you use a rectangular base, the result will be elliptical. In addition, there MUST be some data on the layer you are working with. Transparent layers will not be affected by the filter. Now we'll explore the interface, on which I have enumerated various buttons and controls for you to refer to as we explore. #1 is the preview image, as you work on your sphere, the changes will be reflected in this spot. #16 is an important feature. Click on the white triangle to access the menu. KTP 3 Help is accessed through this button, but also, Preferences and Reset to Normal! Reset to Normal clears all your previous settings, so you can design a new sphere without having to turn off all the settings you used on your last sphere. The various Glue Modes are also available through the Options menu. Under the Preferences setting, if Black Out Screen is unchecked, you will be able to see the rest of your Desktop. Leaving Black Out Screen checked will result in the KPT3 Spheroid Designer interface occupying the entire Desktop.
|
|
| #17 shows the KPT3
preset manager/apply effect buttons. The "-" sign brings
up the Preset manager, and deletes a preset. The "+" sign
allows you to add a preset to the Preset Manager. The Null sign cancels
the current effects, and the Check mark applies the current effects.
|
|
|
|
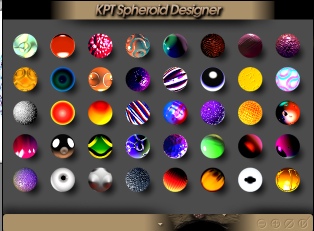
#14 arrow accesses the Preset Manager. You can scroll through the various preset effects. The option buttons in the lower right corner function exactly like the ones in #17. |
|
#10 adds one of the 26 built-in bump map textures. You can go to the Bump Map Manager from that menu, which is the dialog box to the right. You can import .bmps for custom textures by selecting the import button and browsing to the image on your harddrive. Make sure the .bmp you are importing has a different name than one of the built-in .bmp's, otherwise it will be overwritten by the new one!
|
|
|
|
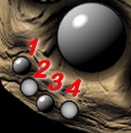
The set of buttons labeled #11 on
the interface above control the bump map options. Click on the
button labeled "1" on the image to the left to change the bump
polarity. A "+" sign raises the texture, a "-"
sign indents the texture.
The button labeled "2" controls the bump height. Click on the button with the left mouse button, hold and drag to the left to decrease the bump height, and to the right to increase the bump height. Button "3" controls the direction of the bump map. Click on the button, hold and drag, and watch the orientation of the bump map texture change in the preview window. Button "4" to the left, controls the Bump Zoom. Click on the button, drag and watch the size of the texture change in the preview. |
|
You can also "grab" the bump map texture by clicking directly in the texture window (#10), and dragging the texture around. This is quite useful if you have imported a bitmap with a lot of differing texture areas.
|
|
| Another control which can affect the way the texture is applied, is #2, the Curvature control. Click and drag on this control to change the amount of curvature on the sphere. Dragging to the left results in negative values, and dragging to the right results in positive values. A setting of "0" will give the sphere a flattened-out appearance. |
|
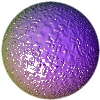
| The sphere on the left has a curvature applied
of 100%. The sphere in the middle has a curvature setting of 0, and
the right sphere has a curvature setting of -100%. You can see how the
position of the highlight light and color have moved, as well as the shape
of the textures.
|
|
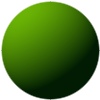
| #3 controls the Ambient
and Diffuse Lighting on the sphere. The small Global dots to the
lower left of this control, affect the Light Diffusion (#1) which is the
glossiness of the surface. The Diffuse Hue dot (#2) controls the color of
the diffuse light. The Ambient Intensity dot (#3) controls the
amount of general light. Ambient Hue (#4) controls the color of the
general light.
|
|
|
|
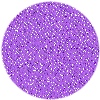
The sphere on the left has a Light Diffusion setting of 0. The sphere on the right has a setting of 100%. |
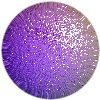
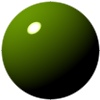
| The sphere on the left has an Ambient Intensity setting of
0. The one on the right is set at 100%. The effect of this
control is dependent on the color of the lights selected. Clicking
on the Diffuse Hue (#2) or the Ambient Hue (#4) dots brings up a color
picker, from which you can select your sphere colors. The Diffuse Hue
color will be the predominant color of your sphere, and the amount of the
Ambient Hue color will be affected by the percentage of Ambient Intensity.
|
|
|
|
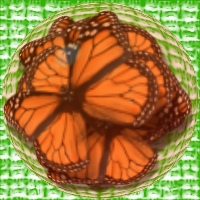
#4 is the Transparency control. As you click and drag on the control, the opacity of the sphere is decreased ( you see the eye appear in the control.) If you have applied this sphere over a pattern, the sphere will take on the underlying image and distort it to make the sphere appear transparent. Like my butterfly paperweight? |
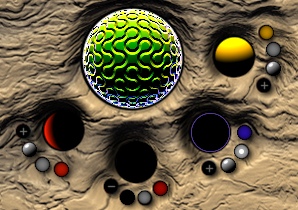
| Surrounding the center preview image are the 4 Lamps (#6
above) and their corresponding Lamp Controls (#7
above.)
Lamps are turned on and off by clicking directly on them. On the image to the right, button #1 controls the light polarity of that lamp. A positive polarity ("+") results in light being shown onto the sphere from the lamp. Negative polarity means that the light is actually sucked OUT of the sphere towards that lamp. Button #2 controls the Light Intensity, from 0 to 200%. Button #3 affects the intensity of the Highlight, from 0 to 100%. Button #4 controls the color of the light, click on that button to call up the Color Picker. The image to the right shows a sphere being constructed with all lamps on, negative polarity on the second lamp.
|
|
| The Mutation Tree, #12
creates random variations of your sphere. Clicking on the dots in
the mutation tree will produce a new sphere. The higher up the mutation tree you go, the more variation you will see
in the new sphere. If your current sphere is close to what you want, click
low on the tree. Clicking higher up the tree will produce a sphere
with more marked variation. Clicking on the Kai's icon, #13 will show your sphere in a full screen preview. Click on the preview to return to the KPT3 interface. The series of nine dots, #15, are the Memory Dots. Similar to Presets, the Memory Dots allow you to store mutations of your sphere. A dark brown dot is an empty dot, amber is a full dot, and red is the current memory dot being applied. Store different mutations of your sphere, and then click on the memory dot to recall that version!
|
|
|
|
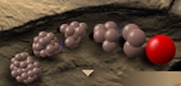
The Apply Options are #9 on
the image above, and shown to the left. You can choose a single
sphere, or 10,50,100,500, or 1000 spheroids by clicking on the
icons. You can also click on the white triangle to show the Apply
Menu, which gives options for various arrangements of multiple
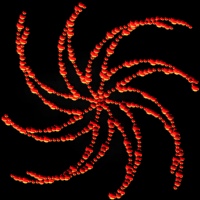
spheres. The Apply Menu also contains an interesting option called
the Genesis Editor. This is a self-contained interface for creating
sphere-based shapes such as stars, vines, coral branches, which can then
be imported to a QuickTime movie. In addition, the settings from the
Genesis Editor are used by the Genesis Packing option of the Apply Menu to
produce patterns of spheres such as the swirled star at left.
|
| WHEW!!!! And that's just ONE filter from KPT 3! Have fun and check out the Gradient Designer, too!
|
|
© Sally Beacham and Dizteq.com 1999-2001