
|
|
|
|
|
|
|
|
|
|
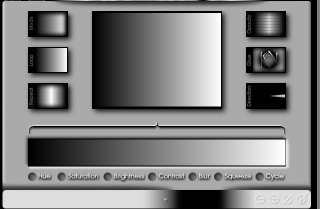
Are you used to my little red numbers by now? Just so you can keep track of what we are talking about...
|
|
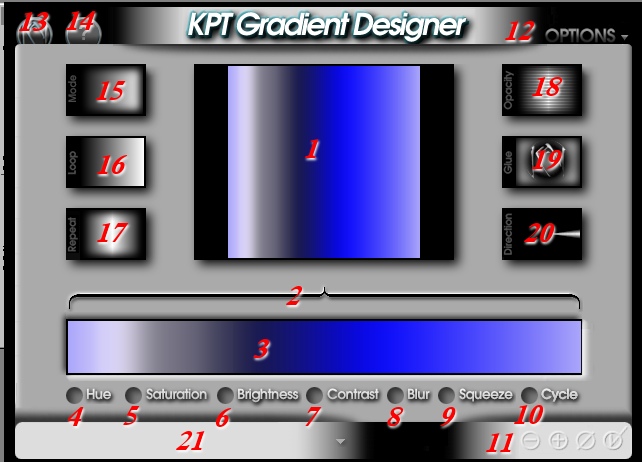
| Certain features of this interface are
consistent with the Spheroid Designer interface. The Preview window
in the center of the interface (# 1)
shows a constantly updated version of your gradient. The Kai's icon
(#13) in the top left corner will give
you a full-screen preview of you work in progress. (You can also use
the keyboard shortcut CTRL W to toggle
back and forth from the full screen preview, very handy!) Button #14
accesses the Gradient Designer Help files. Button #12
gives you the Options menu, where you are allowed to change the
Color Picker Spectrum palettes. Test these by clicking on the
palette name in the option menu, and then clicking on the Color Picker (#3).
Some of these palettes give you some interesting choices, try the
Metallic Dark Glow Spectrum
or the Light Pastel Spectrum
These palettes offer you the choices of shades you will use in your gradient, although the colors you choose are still infinitely edit-able! You can also choose the ever-popular Reset To Normal from the Options menu (#13), which will clear out all your gradient settings on the current gradient. (CTRL E does this as well.) This is very handy, but can be quite aggravating when you realize you haven't saved that fabulous gradient you just made as a preset, but you just reset all your settings! Ouch!
|
|
| The Preferences menu on the Options button allows you to set features such as Graphical Preset representations versus text, and to override the black out screen when you load KPT. This allows you to see the other windows on your desktop. Launch to Previous State means that when you load KPT 3 Gradient Designer, it will launch the gradient you most recently used. |
|
|
|
The Apply Menu (#11 above, and the image to the left here) in the bottom right corner is the same as with the other KPT 3 filters. The checkmark applies the current gradient, the NULL sign cancels the gradient. The plus sign allows you to save the current settings as a preset. Click on the plus sign, and name your gradient preset in the Add Preset dialog box. You can also choose a category to assign your preset too, in order to organize the presets when viewed as text entries. |
| Clicking on the minus sign brings up the Preset Manager. You can Import or Export gradient settings, or delete them altogether from this dialog box. The text names of the gradients coincide with the text names you will see if you choose not to have the Graphical Presets displayed in the Options/Preferences menu (#12.) |
|
|
|
Okay, now we kinda know our way around the interface, let's
make a gradient of our very own!
|
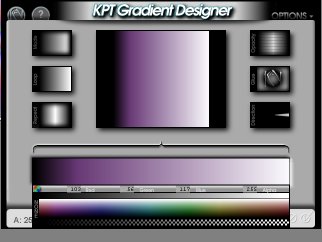
| Let's begin by picking some colors for our gradient.
See that bracket-y lookin' thang over the color bar? That bracket
controls the area of the gradient that you are working on. Grab an end of
it with your mouse, and pull it away from the edge of the color bar.
The area of the gradient that will be affected by whatever changes you
make, lies vertically under the ends of the bracket. In this
instance, the entire gradient will be affected, unless we move the ends of
the bracket. This allows you to keep a section of the gradient
intact, if you are happy with it, and only work on a selected
section. So leave the bracket at full length for now, and
let's get some color...
Go to Options (#12)/ Color Picker Spectrum, and pick a palette you like. Click on it and you will return to the interface, and that palette will be loaded in the color picker for your use. I am going to use the Spectrum Metallic Dark Glow palette. Click on the color bar (#3) and run your mouse over the color picker till you get a shade you like. The color will be reflected in the Preview Window (#1) as you move your mouse.
|
|
|
|
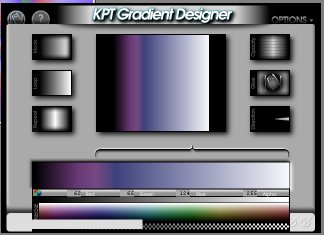
Move the left end of the bracket to the right a bit, and choose another color. See how the original color is left intact on the left side, and the color change takes place within the bracketed area? Move the bracket to the right again, and add another color. Continue adding colors till you like the combination you have. |
Time for a new page, this one's pretty long! © Sally Beacham and Dizteq.com 1999-2001 p |
|