In our first
tutorial for Fritschluft's flAIR plugin suite, we used the
Glow plugin to produce a coloured line art effect. Now
we'll try something a little more complicated (but not much,
still pretty easy!) using the Highlight plugin
and Layer Blend Modes in Paint
Shop Pro 7.04.
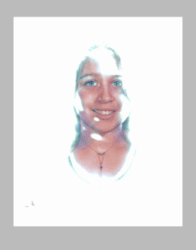
We'll start with another photo. This
time, we've used something most families have dozens of
- SCHOOL PICTURES. You know, those ones that they
line those little darlings up for, hand them a 6 inch rubber
comb, and then, if you're lucky, snap them with their eyes open
and their tongues in their mouths?
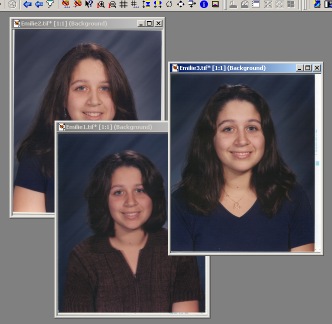
Here I've selected 3 pictures,
same image dimensions, and opened them in my image editor, which
in this case is Paint Shop Pro 7.04. School pictures tend
to be good for this technique, since they tend to have dark
areas and a lot of contrast.
We're going to manipulate
each photo individually, and then composite them to produce
a collage effect. Open each image in Paint Shop
Pro, and make sure they are the same approximate size. Make
sure your Layer Palette is visible, by clicking
on View/Tool Bars and then making sure the Layer
Palette is checked.
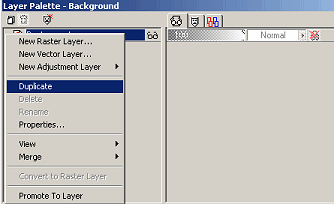
Click on the title
bar of the first image you want to work with, to make it the
active image. Duplicate the original layer of the image
by either going to the Layers menu and choosing
the Duplicate option, or by rightclicking on the
layer title in the Layer Palette, and choosing Duplicate,
as shown below -
This adds a second identical
layer above the original background layer, both of them showing
the original image. Click on the top layer title, in the
Layer Palette, which is titled "Copy of Background
Layer." This makes the top layer the "active
layer" and any effects you add at this point, will be added
to that layer only.
|
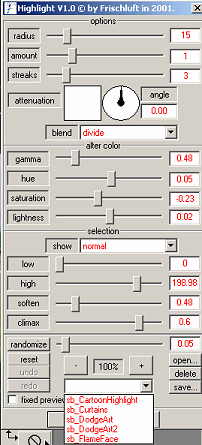
From your Plugins menu,
load the flAIR Highlight plugin. You'll see
a user interface like this one, as well as a
large Preview Pane where your effects will be
updated as you apply them. If this is
the first time you've used Highlight, you'll need
to open the .config file in order to use or
save any presets (and there's a preset in the
config file you'll need for this!) So
click on Open, navigate to the Frischluft folder,
look inside the configs folder for the
Highlight.cfg file and click okay. (If you
are familiar with the Sinedots II plugin, the
config files work exactly the same way.)
Now you should be able
to click on the arrow in the drop down dialog
for presents, to the right of the "save"
button. Any presets you have loaded in
the Highlight.cfg file are now available to you.
Scroll to a preset named sb_DodgeArt.
(The sb_DodgeArt2 and sb_CartoonHighlight presets
are variations on this preset. If you
find the effect too weak or too strong on your
chosen image, try one of the other presets.)
If this preset is not
available, you can duplicate the settings you
see on the interface to the left, to achieve
these results.
You may find you need
to finetune your settings. The "low,"
"high," "soften," and "climax"
settings can all affect the look of this effect.
Try to maintain the significant facial
details while removing most of the colour. This
preset is NOT the end result you are aiming
for, so don't worry that it looks sort of blotchy.
Click Okay to appy the effect to
the top layer of your image.
|
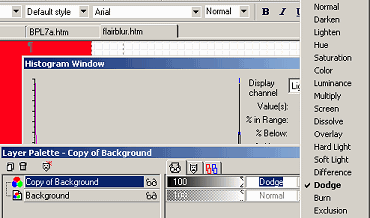
The Highlight effect should be applied
to the top layer of your first image now. In the Layer
Palette, click on the arrow next to the word
"Normal." This opens the Layer Blend Mode
dialog. Click on "Dodge."
|
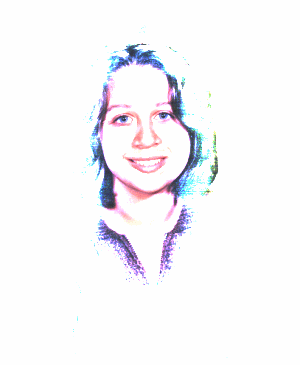
Your image should now look
similar to this. If you click on the "eyeglasses"
on the title bar of the "Copy of Background
Layer" - it will turn that layer off, and you
will see that the background layer is exactly as
it originally was. Conversely, if you turn
off the bottom layer, you will see nothing but solid
black on the top layer. The image needs the
interaction of the Blend Mode layer on top of the
Background layer to produce the effect you see.
Save a copy of this image in .psp format,
in case you lose your work at this point! It
will preserve all your layer information, too. You
can go to Window/Duplicate (or click Shift
D) and this entire image will be duplicated
in your workspace, with complete layer information.
Close out the original layered image, and
work with this duplicate now. Go to Layers,
Merge All, to reduce this image to a single
layer, which does not alter the look of the image
thus far. You can also right click on the
title bars of any of the layers in the Layer
Palette, and choose Merge/Merge All from
that menu, as well.
|
|
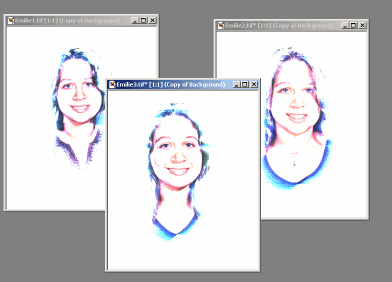
Following the same instructions,
complete the same tasks on each of the remaining original photos.
You should end up with several images of similar size
and coloration. You may find specks of colour that you
want to remove, just set your colour palette foreground colour
to white, use the paint brush tool  and brush them out.
Don't try to make it too perfect, the dots and specks
add to the overall look!
and brush them out.
Don't try to make it too perfect, the dots and specks
add to the overall look!
Let's move to another page,
where we'll look at some ways to assemble our collage!
Next!
More
flAIR projects