|
|
|
||||||||
|
|
|||||||||
|
|
|||||||||
|
|
|||||||||
|
|
|||||||||
|
|
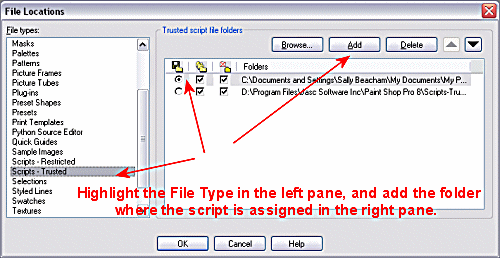
Digital scrapbook files are designed to be print-quality image files - which means they are large in both pixel dimensions and in file size - and they need to be! Image resolution is a concept which has important ramifications for scrappers, so it's in your best interest to understand it and manage it effectively.*here's a LINK to more information than you ever wanted to absorb about resolution!*Almost all digital scrapbookers design at one of two resolutions - either 200 PPI or 300 PPI (Pixels per Inch.) You may have heard or read that digital scrapbook files have to be 300 Pixels per Inch in resolution. That's not true, but nonetheless - those may be the files you choose to work with. (Many designers only design at 300 PPI, and if you like certain designs and want to use them, you may feel you have no choice but to also work at that resolution, so that your elements can be "mixed and matched".) But working at 200 PPI is more "cost-effective" for you, in many ways. Digital images that are created at 200 PPI, versus the same image created at 300 PPI, in the same print dimensions, are 2-4 times SMALLER in file size. This equates to faster download times, less hard drive space to store them, and - most importantly - much less computer power required to work with them. Creating and manipulating a digital layout with 20-30 layers at 200 PPI is much less processor-intensive than the same task at 300 ppi! And - if you have an older or less powerful machine, you will surely appreciate the time saved in not having to wait nearly as long for effects to render on a layout. (Sometimes you could bake a cake while a drop shadow applies!) BUT WAIT! You can now "have your cake and eat it too" - because there IS a solution to this dilemma. You can buy or download all the 300 PPI layout kits you want, and easily convert them to 200 PPI, without losing quality, without losing the original files, and without causing any fuss or muss on anyone's part! You can convert an entire folder full of images in seconds. You can then work with the converted files, exactly as you would have with the 300 PPI files, and still keep the originals around in case you ever need them. And - it's almost as easy as pushing a button. In fact, it IS pushing a button! And best of all - it's free, completely free, all yours, no strings attached. Have a happy! This magic is accomplished through the use of a special script, written for Paint Shop Pro versions 8, 9 and X, which will do all the hard work for you. Here's how it works - 1. Download the script from the link below. *This script was created by Jos Croeze and is free for unlimited use.* **Paint Shop Pro 7 and prior versions will not be able to use this script** 2. Unzip the file and drop it in the Scripts-Trusted folder in the Paint Shop Pro files folder in My Documents (or the Scripts-Trusted folder in the Paint Shop Pro Program folder) in the version of Paint Shop Pro that you use - either PSP 8, 9 or X. If you use more than one version, the script works in all three. You will need to tell all three versions to find the script, but if you are smart enough to need 3 versions of PSP on the same machine, you are smart enough to figure out how to tell all 3 of them to see the same script. ;-)))) Oh all right, I'll tell you anyway. 3. In PSP 8 - go to File>Preferences>File Locations. Highlight the File Type (Scripts-Trusted) in the left pane. If the path to the folder where you stored the script is not already showing in the right pane, add it by clicking Add and then Browse to the location of that folder. Click OK when the folder path shows in the right pane.
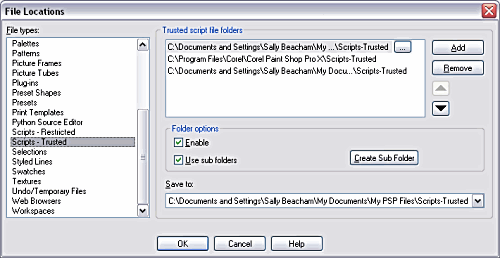
In PSP 9 the process is exactly the same. In PSP X, the process is the same, but the dialog looks slightly different.
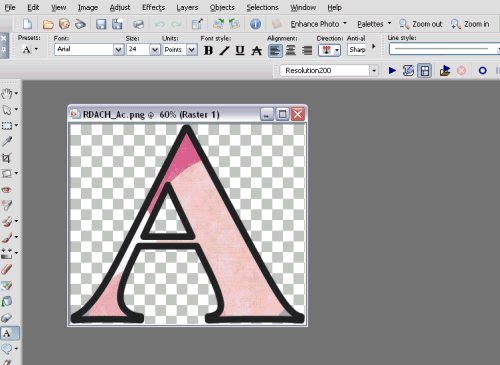
4. Now you're ready to convert a folder full of scrapbook elements! Open Paint Shop Pro. Using the File>Open command, browse to the folder that contains the images you want to convert. Open the first image in the folder, as shown below.
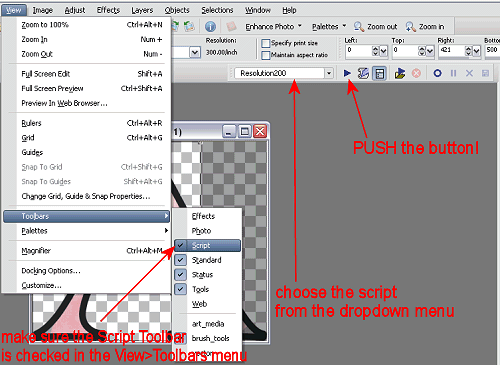
5. Check to make sure the Script Toolbar is visible on the workspace. It's the segment that starts with the name of the Resolution200 script in the image below. If you don't see that toolbar, go to View>Toolbars>Script and make sure the icon is checked (or depressed in PSP 8 or 9.) Once you see the Script toolbar, click on the arrow next to the script name (and yours will likely NOT show that script name initially!) and browse down the list of installed scripts to find the Resolution200 script.
<If you find the Script toolbar takes up too much space or is confusing, you can also run a selected script by going to File>Script>Run and browing to the Resolution200.PspScript in the Scripts-Trusted folder where you installed it. Thanks, Joske, for the reminder!> 6. Once the Resolution200 script shows in the Script Toolbar window, PUSH THE BUTTON next to it - the sideways arrow! You will initially be greeted by the following dialog. Click YES.
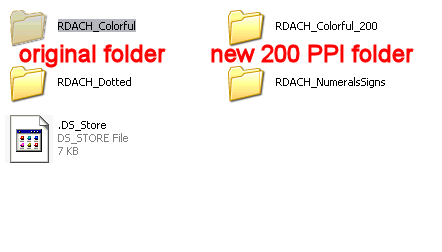
Kaboom, sit back and watch some cool stuff happen! Depending on how many images are in the folder you are trying to convert, this could take a couple seconds to several minutes. When the script finishes, you will find a new folder in the same directory as the original folder which contains the 300 PPI original files, with a similar folder name with "_200" appended to the file name.
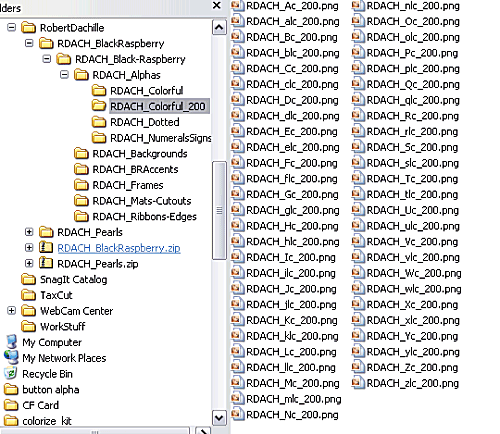
If you then open THAT folder, you will see all the original files have been duplicated, with "_200" appended to their original file names. These new files are 200 PPI resolution, with the same print dimensions as the originals, ready to play! You can then go convert any other folders that you wish, using exactly the same process - open the first file in the folder in Paint Shop Pro, and PUSH THE BUTTON to start the script. Kaboom! Go forth and Scrap at 200, folks!
*Occasionally, a kit which is sold as 300 PPI resolution will contain elements which are NOT 300 PPI, for various reasons, usually design error.The script will automatically resample ALL images in the folder to 200 PPI. The only issue this may create for you is that the elements may not print at the size you expect. This is a design flaw in the layout kit, not the script. If this happens, please contact the designer and ask for the originals to be corrected. If that is not possible, just drop me an email at sally@dizteq.com for advice on how to solve the problem. ;-)))* ** Once in a great while, you may come across a resampled image that looks a little fuzzy around the edges. This is NOT due to the change in resolution, but may be caused by the resizing which occurs in the script, especially if the script is run on images with very high resolution values (600 PPI or greater). If this happens, just give the image a little Unsharp Mask facial in Paint Shop Pro, and things should be beautiful in Scrap Land once again!** *** This script may also be useful for resampling other images, such as entire folders of digital photos. Try it!*** Many thanks for this script go to Jos Croeze, who wrote it, with input from Joske Backer, Lori Davis and myself. Additional thanks go to Roberta D'Achille, of Rendered Memories, who graciously provided several of her 300 PPI kits for testing purposes, and all the happy scrappers in the corel.PaintShopPro_Scrapbooking newsgroup on the Cnews newsserver who inspired the concept and tested the script (and Jos's patience! ;-)))) Stay tuned for Photoshop actions which will accomplish the same feat, and even a freeware option for those of you who work with image editors that don't have batch processing or scripting functions! Feel free to link to this site, especially if you offer 300 PPI scrapbook kits and you'd like to offer your customers an easy option to "have their cake and scrap it too!" |
||||||||
|
|
|||||||||
© Sally Beacham and Dizteq.com 1999-2006
