| |
|
|||||||
|
|
||||||||
|
|
||||||||
|
|
||||||||
|
|
||||||||
Paint Shop Pro X
Here's a very simple PSP X script that will take any ribbon, fiber,
rickrack... and turn it into a square frame. Download the script, unzip it and
place this script in
your Scripts-Restricted folder.
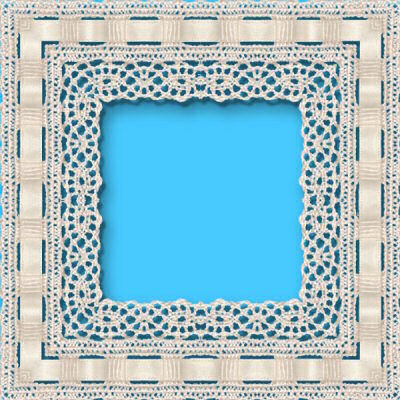
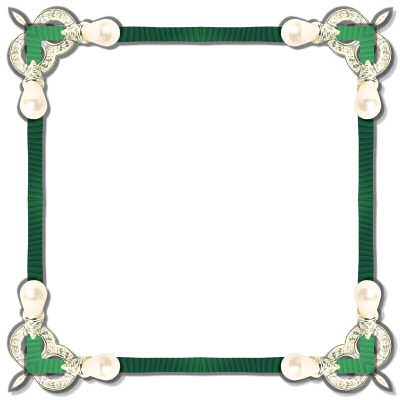
*Crochet ribbon strip courtesy Robin "Hoodsy" Rowlands* 1. Use any length or width of ribbon you want, but make sure there is NO
transparent space at the ends of the ribbon, not even a pixel - otherwise
you'll get a tiny (or not so tiny) little area in the center of each side.
Make sure you are on a raster layer, not a true background layer.
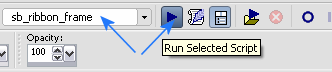
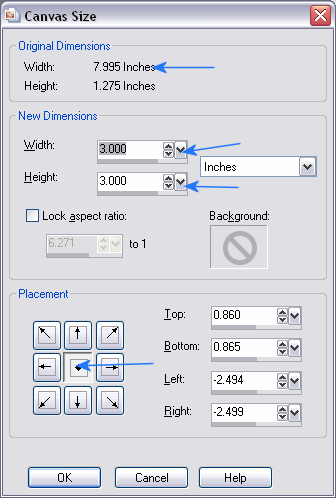
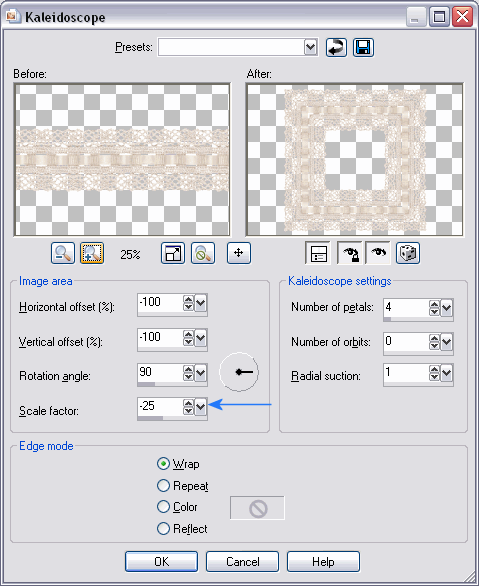
2. Navigate to the script (sb_ribbon_frame) in the dropdown script menu on the Scripting toolbar. (If your Scripting toolbar is not visible, to go View>Toolbars> and click on the Script toolbar so that's checked in the menu.) Run the script by clicking on the arrow to the right of the dropdown menu. 3. The script is interactive. You'll have the option to make changes to each step, but if you want to use the default settings, just click OK in each dialog. When the Canvas Resize dialog comes up, set the width for NO longer than the original ribbon's length (which you'll see right above those settings.) The new height setting determines (somewhat) the size of the new frame produced. Even though this is a longer ribbon, I only want a 3 inch square frame, so I set the width and height to 3 inches in the Canvas Resize dialog. 4. When the Kaleidoscope dialog opens, the Scale Factor determines how large the actual frame will be - so play with that bit! You probably don't want the edges of the frame to touch the outside edge of the canvas, so scale down a bit if needed.
5. You should get perfectly mitered corners on sqare frames. If you can't get rid of that little center piece of schmutz, it will take about two seconds to clone over it. Use a hard-edged clone brush, aligned mode and just use a nearby area as the source. You can also select an area of the ribbon that doesn't have the schmutz, copy and paste it as a new layer, move it right over the schmutz. Schmutz be gone!
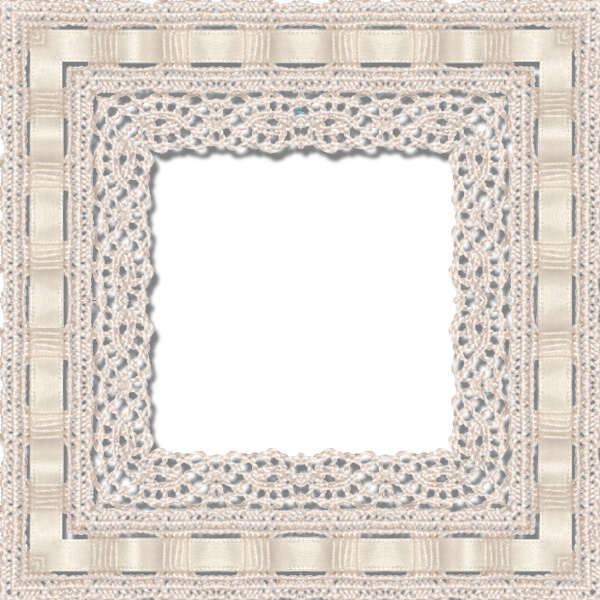
6. If you do rickrack or corrugated, you'll have to make sure you crop exactly
right - the repeats will be scroo'd up if you don't. (Although, the results
are often cool, even if unexpected.) 7. You can make cool layered ribbon frames by laying skinny ribbons over wider
ones (add your drop shadow first to the top ones only, but be careful with
large opaque shadows, they won't fall in the right direction and may look
odd in the final result.) Merge the layers and then run the script. 8. If you run this on 12 inch ribbons, and make the Canvas Size 12 inches high in the dialog, you'll get a frame big enough to overlay an whole layout. You can also try it on curly ribbon bits, you can get some cool stuff! If you don't see anything in the Kaleidoscope preview window, turn down the Scale factor... and change the angle in increments of 45 degrees to get some OTHER neat effects. The frame below was created with a single ribbon with ornament already applied before running the script.
|
||||||||

© Sally Beacham and Dizteq.com 1999-2006