How Do I Colorize Thee - Two Times?
You might want to colorize an existing element, but retain the
original colors in certain areas. Or - you might want one section to be one
color, and another a different color. One way to do that is by using selections
- select the area you want colored one way, colorize it, invert the selection,
colorize the rest the other color. Or... you might need to select each area
individually. This can be labourious (right, Kelly?) and once you do it, you
don't want to have to do it again, so you might consider saving those selections
themselves as you go along. You can Save to Disk, which means the selections
are saved to a separate file on your hard drive (or other disk) and can be
reloaded at a later date to any image. OR, you might Save to Alpha - which is a
special channel in some image formats which allows things like selections and
masks to be stored right along with the image. You never see those selections
until you tell your image editor to show them. For most people's uses,
proprietary image formats like pspimage or .psd will store the alpha channel
selection (TIFF's and PNG's use an alpha channel to store
transparency/selection/mask information, which can be re-loaded in PSP, but may
not necessarily be available in other image editors.)
However, sometimes
you want a less tedious way to "separate" the areas of the image you want to
colorize, rather than dealing with creating selections (which can be a pain in
the butt, depending on the type of area you're selecting.) Of course, every
image is different, every effect is different, and what you want to achieve in
the long run often dictates what method you'll use.
In this case, I want
to colorize the tag with the pearl beads. I'd like the tag to be one color and
the beads another, so I know this will have to be done in two separate stages.
What to do what to do?
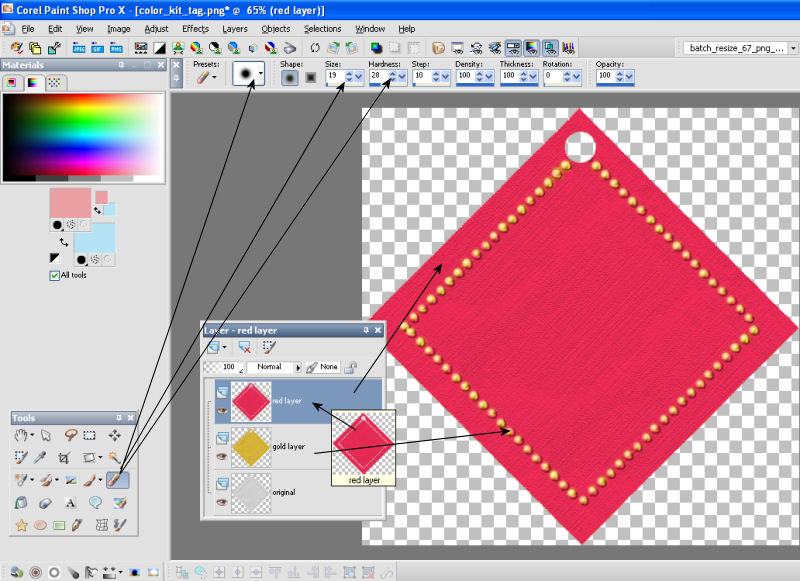
Open the tag image. Go to Layers>Duplicate. If
you look at the Layers Palette, you'll see you have two layers, exactly alike.
If you refer to my attached image, you'll actually see three layers - I kept the
original one for reference in this display. That one really doesn't matter for
what we are going to do. I've renamed the layers so that you can more easily
relate to which one is which,if the concept of "layers" is new to
you.
Click on the bottom layer title bar in the Layers Palette. (In my
image, it's actually the middle layer. When you click on it, you'll see the
layer title bar turn blue, as my top layer is in the image.) This makes the
bottom layer the "active" layer. Use whatever method you like to colorize this
layer. Here I've colorized it a golden yellow. You won't see this, though, on
the image itself, because the top layer is still gray and it's hiding that
under-layer.
Click on the top layer title in the Layers Palette to make
it the active layer. Colorize THAT layer now. I've used cherry red. Now your
image should look cherry-red, but the yellow layer is still there, it's just
hidden by the top layer. (You can turn the layer on or off by clicking on that
little "eye" next to each layer title if it makes it easier to understand what
layer you are working on. Remember - the blue highlight on the layer title
indicates the active layer.)
Make sure the top (red) layer is the active
layer. Now activate the Eraser tool. In the Tool Options palette, set the
Eraser brush style to round, the size to about 19, and the Hardness to about
28. You have now created a round-edged eraser "tip" with very soft edges, about
the same size as a pearl on the tag. Why soft edges? Because a pearl would
normally reflect a bit of it's colored environment, and I want a bit of the red
left when my gold pearls show through. By setting a low value for brush
hardness, the edges become less defined, allowing a gradually decreasing number
of erased pixels (transparency!) towards the eraser tip edges.
Click on
each red pearl one or two times. The eraser should erase most of the red pearl,
allowing the gold pearl underneath to show through. I'll bet you can see where
it's going from here! One click will handle most pearls, so just click your
eraser all the way around the line of pearls. Don't worry if it isn't "perfect"
- there should be a small amount of reddish glow showing toward the bottom edge
of each pearl.
In my figure, you can see the layer thumbnail view for the
top layer shows the erased "holes" in the red layer. Et voila.
Now,
let's say you decided gold pearls aren't the thing, you really want pink or
peach or mint. Click on the gold layer to activate it, colorize it to the
desired effect, and you should instantly see the color change. Or - you like
the gold pearls but the red tag has gotta go. Click on the red layer, change
it's color, et voila again.
You can immediately export the image to .PNG,
but that of course will merge it's layers, so don't forget to save it as
.pspimage first. You'll be able to go back and change either layer color any
time you want, just by activating the layer and colorizing it.
(In case
any of you are wondering, you have also just learned to "spot colorize" a
photo. Take a color photo, duplicate it to a new layer. Turn the top layer to
grayscale using any method available. Use the eraser brush to erase the object
that you'd like to show in color from the under layer. How easy is that?)