|
|
Want a quick and fun text effect using Paint Shop Pro 7.04 and Dragonfly's RetroDots plugin?
Open a 600 x 300 image in Paint Shop Pro,
white background, 16.7 million colours. Open the Text editor ![]() and apply your text as100 point, standard, vector text. The colour doesn't
matter, we will be changing it with the plugin! I'm using a fat font here,
EwieD, which will show off those polka dots. Click OK to apply your text,
then position your text in the image where you would like it.
and apply your text as100 point, standard, vector text. The colour doesn't
matter, we will be changing it with the plugin! I'm using a fat font here,
EwieD, which will show off those polka dots. Click OK to apply your text,
then position your text in the image where you would like it.

Click on the center box (handle) to move the text around the workspace. Click on the side handles to change the width of the text, and the top or bottom handles to change the height. When you are satisfied with the size and positioning of your text, click on Layer/Convert to Raster Layer. This layer will become Layer1 in your layer palette.

Make sure Layer1 is active (it should show the dark blue
highlight, like it does in the above example.) If not, just click on the
Layer1 name in the layer palette. Using the Magic Wand ![]() ,
select the text. A quick way to select all the letters, and exclude the
interior portions of the letters, is to click on Selections/Modify/Select
Similar, after you have selected one letter with the Magic Wand.
,
select the text. A quick way to select all the letters, and exclude the
interior portions of the letters, is to click on Selections/Modify/Select
Similar, after you have selected one letter with the Magic Wand.
An alternative method is to apply the text as "Floating" rather than "Vector" in the Text editor. The disadvantage of this method - you won't be able to adjust the height and width of the text, as you can with vector text. You can, however, reposition it in the image by clicking on the text and moving it to the spot you desire. Another advantage, you won't need to convert the layer to a raster layer, and you will be able to go directly to the next step, as your text should still be selected after you apply and reposition it as "Floating" text. The layer palette will show a "Floating Selection" layer.
Go to your Effects/Plugins menu and open the RetroDots filter (it should show in your menu under the Dragonfly category.) When the plugin loads, the preview pane may actually be on top of the interface, if so, click and drag the preview pane away from the control panel.
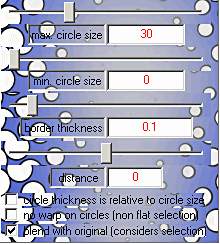
The first section of the interface consists of position controls. X and Y co-ordinates as well as direction of the rows of dots can be set.

You can input the X and Y co-ordinates numerically, and the direction can be controlled either by the slider above the box, or by the numeric input box.
The next section of the interface controls the size of the dots, and their borders. You have the option to use the slider or the numeric input box for many of the controls. You can get some unusual effects if you make the "min.circle size" much larger than the "max.circle size."

Border thickness controls the width of the "ring" around the dots, if any. The "distance" control affects the space between individual dots.
The three checkboxes control other aspects of the dots application. "Circle thickness" will be modified relative to the size of the circle, if that box is check. "No warp on circles" is handy, when checked it forces RetroDots to drop off any dots at the inside edge of a circular selection so that only "whole" dots are shown, and not ones that will be clipped off at the edges of the circular selection. "Blend with original" controls how the plugin will be shown in the preview pane, if checked, the actual areas outside the selection will be shown in the preview pane.
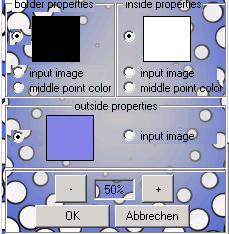
The bottom section of the interface shows the colour controls for the dots, their borders, and the area outside the dots.

For both the dots and their borders, you can select a colour by clicking on the colour chip itself, which opens a standard Windows colour picker. You can also use the source, or "input" image, as the border fill, the dot fill, or the outside fill. A really neat feature, for both the border and inside dot fill, you can use the "middle point color" feature. This will give you multi-coloured dots and/or borders, sampled from the colours in the input image.
The zoom buttons are standard, the + and - keys give you a fixed percentage zoom up to 100%. "Ok" is the apply button and "abbrechen" is "cancel, no, don't do that, stop, cut it out, fuggedaboudit."
Okay, now we know what's happenin' with the interface, back to our text effect! We currently have our text positioned and selected on it's own layer, with the interface open. Leave your X and Y co-ordinates at .50 each, and set your direction to 45. Set your max.circle size at 20 and your border width at .10. Set your inside colour to a pleasing polka-dotty shade, your border colour to black, and your outside properties colour to a contrasting pleasing polka-dotty shade! Click OK.
RetroDots does not seem to anti-alias edges smoothly, so we are going to take jaggy prevention measures! Your text should still be selected, though filled with lovely polka-dots. Go to Selections/Modify/Contract and contract by 1.
Go to Effects/3D Effects/ Drop Shadow, and apply a shadow with horizontal and vertical offsets of 0, opacity of about 80 and blur of about 60, in a complementary colour to the polka-dots. Now, go to Effects/3DEffects/Drop Shadow again and apply a black drop shadow with horizontal and vertical offsets of 2, opacity of 100 and blur of 3.5. Click ok, and then save your image as a .gif, for display on the Web.

Here's an example using PSP 7.04's Red Lava Pattern fill on the original text. When the plugin was applied, "middle point colour" was selected for the inside properties fill, a light gray colour was selected for the outside properties fill, and "input image" was chosen as the border properties fill. The border size was set at 25, max.circle size at 30.

Hope you've enjoyed your trip into the RetroDots interface, time to go dot-spotty silly!
Want to learn more about Photoshop-compatible plugins? Check out the Filter Frenzy series of classes at www.lvsonline.com .
While you are at it, drop by the PSP Vector Toons, FrontPage 2002, and Xara X classes!
|
|
|
|
|
|
|
©1999-2001 Sally Beacham and dizteq.com