Resolving That Pesky Resolution Question

 So you want to create a digital scrapbook layout, but are confused about what resolution is ideal for your needs?  Well, Binky, let's solve that right now - on your own terms!

First, you'll need to create some test images.  For the purposes of this test, you'll need to create identical images at varying resolutions, in the same application, and printed on the same printer (yours!) at the exact same settings.

In your image editor, begin by creating a 3 inch x 3 inch graphic, at a resolution of 72 pixels per inch.  This resolution is common for Web graphics, so we'll use this to compare to what we hope to produce for print results.  

Now we need something on this image, that will be easy to duplicate but will be a good test for our printer, as well as be appropriate to a file format we might commonly use.  The file format I've chosen is JPEG, because that's a common photo file format, and if you are scrapbooking, you are working with a lot of photos.  I'm going to use a simple image consisting of a circular rainbow gradient - the JPEG file format is well suited to gradients, so this will be a good test image.

Fill your 3x3, 72 ppi graphic with this gradient (how you do that is up to you, in your own image editor.)   Save it as a JPEG.  If your image editor offers an Export option or an Optimizer, use that, with the compression settings at whatever you normally use for photos ( I usually use between 10% and 20% compression for photos.)  Make a note of these settings, it's important to use the same ones later.  Make sure you name your image something easily identifiable, such ast 72test.jpg.


Now, create another 3x3 image, this one at 200 ppi, and fill it with the same gradient as the first.  Save this image with the exact same compression settings, using the same Export or Optimizer options, as a JPEG (and don't forget to name it something identifiable, like 200test.jpg!)

Finally, create one more 3x3 image, this time at 300 ppi, and fill it with, you guessed it, the same gradient.  And... I bet you figured this one out... save it with the same compression settings, as a JPEG, named 300 test.jpg!

Okay, now we have our test images.  Here's a screen capture of mine, in Paint Shop Pro 8.1 - you'll note that even though each one of these images was created as a 3 inch by 3 inch graphic, there are dramatic differences in sizes ON THE MONITOR. That's because - a pixel is a pixel is a pixel, and your monitor only reads pixels, not inches.  So we told one image it was 3x72 pixels per inch (or 256 pixels wide and tall) and other 3x200 pixels per inch (or 600 pixels wide and tall) and the final image 3x300 pixels per inch, or 900 pixels wide and tall!  And that's all your computer monitor knows.


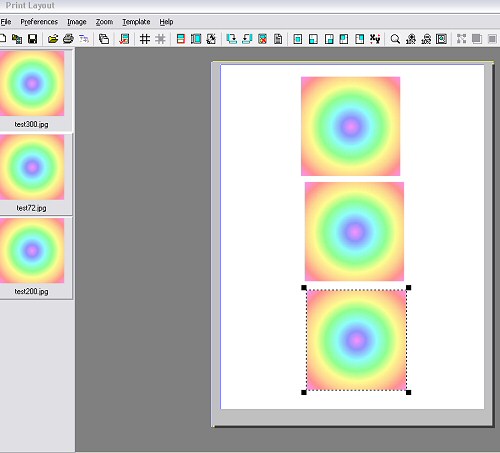
Figure 1 - Images of differing resolutions, but similar physical dimensions

    If you have the option to create a Print Layout in your image editor, you can print all these separate images on a single page.  If not, DO NOT, repeat DO NOT, paste them all into a single image and attempt this test!  Doing so will resample all the images to the same resolution as the image they are pasted into.  If you don't have a Print Layout option, print 3 separate pages, one for each image.  Photoshop Elements 2.0 doesn't allow you to print multiple images on the same page.  Digital Image Pro 2.0 DOES allow you to add different images to a print layout, but it's a little confusing, so make sure you get the right images in the right spots!

    Here's a shot of the Print Layout feature in Paint Shop Pro 8.1, with the three separate images ready to print on a single page.  This is NOT the same as creating an image composite, this method allows you to print separate images with different resolutions on the same page.  As you can see in the Print Layout Preview, even though all three images looked to be different sizes while in the application itself, once they are previewed on the page they are shown in their actual physical dimensions.

    Figure 2 Print Layout showing separate images prepared for print on a single sheet

    Align the images so that you can remember which is which (I suggest putting the 200 ppi in the middle, so you can compare it to the high resolution and low resolution easily!)  Print this layout on the type of paper you most often use for your digital scrapbook layouts.  If you are printing separate images, make sure you use the exact same printer settings for each page, and use the same paper for each.

    Now you've got your test images!  Compare the 200 ppi image to the 72 ppi image. See any difference?  It's probable you will - 72 ppi is adequate for Web graphics, but might show visible "ink dots" to the human eye.  Now compare the 200 ppi image to the 300 ppi image.  Can you see any differences?  Look at the edges, and the areas of colour change.  It may help to cover the image you aren't comparing with another sheet of paper so you aren't distracted.

    Now for the REAL test.  You obviously know which image is which, so you might be subconsciously twisting your own arm to like one more than the other, no matter what your eyes are telling you.  Go grab your husband, your kid, your next door neighbor, the postman - show them the layout, and ask THEM which one is best.  (And no, don't tell them which is which!  This is your ink and hard drive space we are talking about here, make this a fair test!)  Get the opinions of a  cross-section of unbiased innocent bystanders, and decide which option makes the most sense for you, with your printer!  Good luck!


About.com Featured Site - Blade Pro

The Leader in Virtual Studies!

Please join us at LVS Online for the best in online education.  I teach several Paint Shop Pro 8 classes, as well as the new Memory Page Fundamentals, and Memory Page Design classes (with Cindi Bisson.)   Xara X is taught by Ron Lacey and myself, and there are 45+ other classes to choose from (including new Digital Photography classes with Ron!)  We add new classes every session, so if we don't yet offer a class in something you want, keep watching, or better yet, email a suggestion to questions@lvsonline.com!


Email Sally @ sbeacham@dizteq.com

Sally Beacham and Dizteq.com 1999-2004