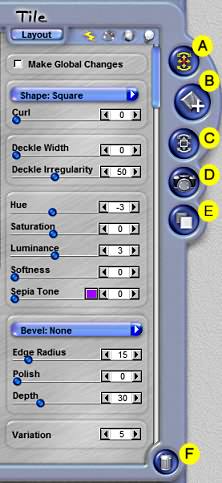
DS
 

The Tile filter is part of the DreamSuite Series 2 Set. Tile will add depth and dimension to your photos as well as apply shapes and unique photo-realistic looks.

 
Tile Example
 

Effect Tab
This Tab, the blue button with "Layout" on it, will allow you to change the automatic setup controls of the effect. Warning: You will lose all manual effect settings whenever you adjust any of the automatic controls located in the Layout mode.

A. Transform Effect
This tool allows you to Select, Move, Scale, Stretch and Rotate effects.

  • To Move an effect, click to select it. Then place the cursor on the inside of transformation box surrounding the effect, and the cursor will display a four-sided arrow. Once this cursor is displayed, click and drag to move the effect to a new location.
  • To Scale, place the cursor on one of the corners of the transformation box, and it will change to an angled double-sided arrow.Click and drag to scale (hold the shift key down to constrain the scale to proportional dimensions).
  • To Rotate, place the cursor outside of any of the box corner handles, and the cursor will display a curved arrow. Click and drag the box to the desired angle, and release the mouse.
  • To Stretch an effect, move the cursor over the box sides and adouble-sided arrow will appear. Click and drag to stretch the effect in the desired direction and proportion.

B. Clone Effect
This tool is used to create new effects that are based on the currently-selected effect; or if no effect is selected, from the default effect settings. Click onscreen with this tool, and a copy of the currently selected effect will be cloned.

C. Transform Photo
This tool allows you to Select, Move, Scale, Stretch and Rotate photos that are part of an effect. It works the same as the Transform Puzzle Pieces on with your image.

Tile - Effects Tab

D. Load Photo
This tool is used to replace an image that is inside of an effect. When new effects are created, they automatically create a copy of the original image into the effect. In most cases, you will want to load in another image instead. With this tool selected, click over the photo area inside the effect, and you will be shown a small onscreen menu that allows you to load a new image, turn the image area transparent or reload the original image.

E. Adjust Up or Down
This control moves the selected portion of the effect over or under another part of the effect. In the case of Tile, the selected tile will be moved under or over another tile. Use the Edit Menu > Bring To Front and Send To Back command in conjunction with this tool.

F. Delecte
This tool is used to delete effects, paths and ellipses. Select this tool, and then click over the item you want to delete. When this tool is active, you are shown all effect ellipses and paths from all tools you have used.

Make Changes Global
When this is checked, it will apply any control changes you make to the entire effect, altering all elements that are affected by the control you are working with. This is useful if you desire to adjust, for example, the Curl on all tiles globally. You may uncheck or check this as many times as you like, and your settings will be preserved.

Shape
This menu allows you to change the selected tile to a different shape. To use this control, select a tile with the transform effect tool, and then select a shape from the Shape menu.

Curl
This slider control shades the edges and curls the edges of the tiles to give them additional depth.

Deckle Width
This slider control is used to apply a deckled edge along the tile to simulate the tile having been ripped versus cut. The higher the setting, the wider the deckle becomes.

Deckle Irregularity
This slider control will make the deckle edges more or less irregular. The higher the setting, the more irregular and varied the edges of the deckle become.

Hue
This slider shifts the color values of the image across a color spectrum. This control will not affect the the lightness or saturation while it shifts the colors of the artwork.

Saturation
This slider makes the colors in the image more or less vibrant. This control is useful for making an image's colors pop, while not affecting the overall tone or lightness.

Luminance
This slider adjusts the luminance or "light" qualities in an image to either darken or lighten the image.

Softness
This slider will soften the selected image making it look out of focus.

Sepia
This slider control adds a subtle color tint to the image. Use the slider to control the amount of tint applied to the image and the color box to define the color of the sepia that is used.

Bevel Type Menu
This menu allows you to select a bevel style that will be applied to the selected tile. Adding a bevel to the tile will enable you to give the tile more depth and a unique appearance.

Edge Radius
This slider adjusts the angle and sharpness of the bevel edge. Use this control with Polish and Bevel Depth sliders to refine the look of the depth effect.

Polish
This slider rounds and smoothes the angles of the bevel making them softer with gentle curves versus sharp angles. Use this control with the Edge Radius and Bevel Depth sliders to refine the look of the depth.

Depth
This slider changes the height of the bevel. Stronger settings make the bevel appear to have more height and depth. Use this control with the Edge Radius and Polish Curvature sliders to refine the look of the depth effect.

Variation
This controls the random generation of settings used to create each effect's distinctive patterns. If you are using the Deckle irregularity control, for example, the pattern of irregularity will be varied each time you adjusted the variation control.

 
TutorialsHomeNext Page
 

By Joe Cilinceon, © July 31, 2002