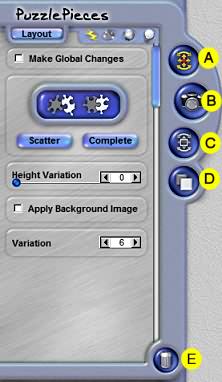
DS
 

The Puzzle Pieces filter is part of the DreamSuite Series 2 Set. Turn your photos into puzzles with this very powerful and fun to use effect. You may add Stamp shapes and rearrange the puzzle shapes as desired for unique looks.

NOTE: The following tutorial covers just the controls or click on the example below for tips on how I got the effect.

 
Puzzle Pieces Example - Click for Tips
 

Effect Tab
This Tab, the blue button with "Layout" on it, will allow you to change the automatic setup controls of the effect. Warning: You will lose all manual effect settings whenever you adjust any of the automatic controls located in the Layout mode.

A. Transform Puzzle Piece
This tool allows you to Select, Move and Rotate effects. You may not, however, scale the pieces.

  • To Move an effect, click to select it; place the cursor on the inside of transformation box surrounding the effect, and the cursor will display a four-sided arrow. Once this cursor is displayed, click and drag to move the effect to a new location.
  • To Rotate, place the cursor outside of any of the box corner handles and the cursor will display a curved arrow. Now click and drag the box to the desired angle, and release the mouse.

B. Load Photo
This is used to replace an image that is inside of an effect. When new effects are created, they automatically create a copy of the original image into the effect. In most cases, you will want to load in another image instead. With this tool selected, click over the photo area inside the effect, and you will be shown a small onscreen menu that allows you to load a new image, turn the image area transparent or reload the original image.

Puzzle Pieces - Effects Tab

C. Transform Photo
This tool allows you to Select, Move, Scale, Stretch and Rotate photos that are part of an effect. It works the same as the Transform Puzzle Pieces on your image.

D. Adjust Up or Down
This control moves the selected portion of the effect over or under another part of the effect. In the case of Puzzle Pieces, the selected Puzzle Piece will be moved under or over another Puzzle Piece that has been lifted from the main puzzle. Use the Edit Menu > Bring To Front and Send To Back command in conjunction with this tool if desired.

E. Delete
This tool is used to delete effects, paths and ellipses. Select this tool and then click over the item you want to delete. When this tool is active you are shown all effect ellipses and paths from all tools you have used.

Scatter Tool
This tool allows you to click on any interlocked piece of puzzle and break it apart from the whole using a random scattered placement. When you click on the piece, it will be lifted from the puzzle and set down at another location.

Complete Tool
This tool allows you to selectively put a puzzle together, by selecting either a single piece or a hole in the puzzle.

Auto Scatter
This button will take a puzzle and break it apart into pieces that are randomly scattered around. After the pieces are scattered, you can use the Complete Tool to selectively assemble the puzzle back together again one piece at a time.

Auto Complete
This button will take a puzzle that is broken apart and reassemble it back together again. After a puzzle is assembled together, you can use the Auto Scatter tool to selectively scatter parts of the puzzle or use the Transform tool to manually move and position the pieces as desired.

Height Variation
This slider controls the global variation of all the pieces and how well interlocked they are. To make the pieces look as though they are not locked down tightly set the Height Variation Control to a higher setting.

Apply Background Image
When this is checked, the background image behind the selection will show up in the preview and will also apply as part of the effect.

Variation
This controls the random generation of settings used to create each effect's distinctive patterns. If you are using the Deckle irregularity control, for example, the pattern of irregularity would be varied each time you adjusted the Variation control.


Click on Right arrow below for page 2.

 
TutorialsHomeNext Page
 

By Joe Cilinceon, © July 30, 2002