DS
 

The Photo Press effect is part of the DreamSuite 2 Set. Photo Press takes a masked section of a photo and presses it down into the background area around the selection creating the illusion of depth.

 
Ripple Example
 

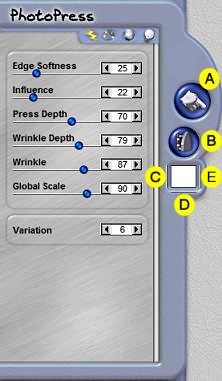
Before you use PhotoPress, you need to setup your image with a selection around the portion of the image that you want to apply the pressed look to. Once you have a selection around the part of the photo you want the press effect in you can then apply the effect. You should have the photo and the background on the same layer.

A. Add Bulge Brush
The is used to lift up the image in a localized area. Use the Depth slider to control the amount of the Bulge. This brush is useful for touching up areas around your image to help add to the illusion of depth.

B. Iron Brush
This affects the wrinkles on the image in a localized area that you brush over. As you brush, the image reverts back to its former self.

The Brush Opacity control defines how much influence the brush has on the image. The more opaque the brush, the more influence it has. The more transparent, the less result you will see when brushing with this tool. Increase the size of the brush to affect a larger area with this tool.

Photo Press Controls

C. Brush Opacity
Click on this vertical slider control to access the opacity control. The higher settings are more opaque, which will increase the results, and lower, semitransparent settings, reduce the results.

D. Brush Size
Click the horizontal slider to access the brush size control. As you adjust the size control, you will be shown a brush attributes window. The brush attributes window displays the actual size, opacity and feather attributes of the brush as they will be applied when you brush.

E. Brush Feather
Click the vertical slider to access the brush feather control. As you adjust the feather control, you will be shown a brush attributes window. The brush attributes window displays the actual size, opacity and feather attributes of the brush as they will be applied when you brush.

Edge Softness
This slider controls the depth that is applied to the selected part of the image that is being pressed down into the background.

Depth
This slider controls the height and depth of the wrinkles and overall impression the selected parts of the photo make on the background.

Wrinkle
This slider controls how many wrinkles appear on the effect. Use this control in conjunction with the Depth control to define the characteristics of the wrinkles.

Global Scale
This slider control defines the size of the effect as it is applied to the image. Use this control to scale the size of the effect on a constrained basis.

Variation
This controls the random generation of settings used to create each effect's distinctive patterns. Changing the Variation value for the effect will provide a unique look each time the setting is changed.

 
TutorialsHome
 

By Joe Cilinceon, © July 30, 2002