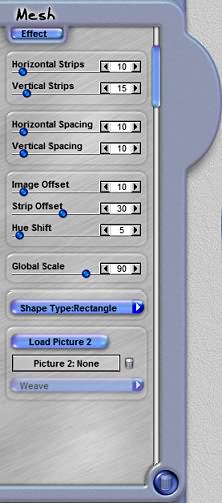
DS
 

Mesh - Layout Mode page 2.


Layout Tab
This Tab, the blue button with "Effect" on it, allows you to slice your image up into strips and weave them together in a photo mesh that is highly unique and photo-realistic. The Layout mode lets you set up the effect. Warning: If you leave the Layout mode and then return after having made manual adjustments to your effect, you will lose all manual effect settings. Use the layout mode to get your effect started, and then do not return to this mode. Return to Page 1 of this tutorial for Effects Mode Controls.

Horizontal Strips
This slider control defines how many strips the photo is cut into and then meshed in a horizontal direction. The number indicated in the data box defines how many strips will be generated by this effect. You reduce the number of strips by using the Delete tool to remove a selected strip. You can add strips by using the Clone Effect tool to reproduce a selected strip.

Vertical Strips
This slider control defines how many strips the photo is cut into and then meshed in a vertical direction. The number indicated in the data box defines how many strips will be generated by this effect. You reduce the number of strips by using the Delete tool to remove a selected strip. You can add strips by using the Clone Effect tool to reproduce a selected strip.

Mesh - Layout Mode Control

Horizontal Spacing
This slider control defines how much space is generated between each horizontal strip on a global evenly distributed basis. You can move and adjust the spacing between specific strips by using the Transform Effect tool to reposition, rotate, resize or free transform the strip as desired.

Vertical Spacing
This slider control defines how much space is generated between each vertical strip on a globally on an evenly-distributed basis. You can move and adjust the Effect spacing between specific strips by using the Transform Effect tool to reposition, rotate, resize or free transform the strip as desired.

Image Offset
This slider control allows you to offset the image inside all the strips globally. The higher the setting on this control, the more the image is offset. You can manually shift an image's position by using the Transform Photo tool.

Strip Offset
This slider control shifts the strips vertical and horizontal alignment where they are not evenly aligned on all sides of the effect. You can manually shift a strip's position and alignment by using the Transform Effect tool on the strip you have selected.

Hue Shift
This slider control applies a subtle shift of color values for each photo in each strip. This shift helps to differentiate the strips and simulate how a real photo cut into strips may look if different prints from different printers were cut up and stripped together.

Global Scale
This slider control defines the size of the Mesh as it is applied to the image. Use this control to scale the size of the Mesh on a constrained basis.

Shape Type
Use this menu to quickly reshape the geometric pattern of the Mesh as it is applied to your image. Change it from a rectangle to a Triangle, for example.

Load Picture Two
This button allows you to load a photo using the Select Image Dialog window. The photo will be placed in the mesh pattern as a second photo weaved with the first one.

Picture Two Name
This field displays the name of the photo you have loaded using the Picture Two button.

Delete Picture Two
Is the button just to the right of the Picture Two Name Field. Pressing this button will remove the Picture Two from the effect.

Weave Type
This menu allows you to define how Picture Two and the original image are meshed together.

 
Back to Page 1HomeTutorials
 

By Joe Cilinceon, © July 30, 2002