DS
 

Lighting Controls

Each effect in the DreamSuite Series has a unique set of controls. As such, not all effects will use all of the Lighting Controls. Certain effects may even have unique lighting controls which will be included in their tutorial pages. The image below shows the Lighting Control as the first button from the right side.

 
Control Tabs
Effect - Surface - Environment - Lighting
 

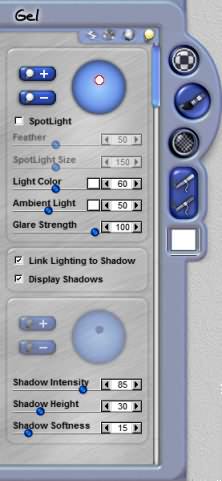
DreamSuite's Lighting controls allow you to:

  • Create new lights and set their relative height, strength and color.
  • Adjust the ambient light that surrounds the effect.
  • Independently control multiple lights points separate from the shadows.
  • Automatically or manually adjust shadows that are created by lights.
  • Create multiple shadows that are linked to lighting adjustments.
  • Independently control shadow color, opacity and softness.
  • Define the relative height of the artwork by adjusting the shadow offset values.
 

Add Light Points
Click on the plus button to add a new light point to the Light Sphere.

Delete Light Point
Select the light on the Light Sphere then hit the minus button. When a light point is deleted the corresponding Shadow Point is deleted as well, unless the Link Lighting to Shadow checkbox is off.

Lighting Controls

Light Sphere
This control is very easy to use and understand. On the Light Sphere, you will see a circle which is called a Light Point. This circle represents a light source and is used to set the angle and height of a light source. If multiple light sources are in use, the active light point will be circled in red. The shadow point (located on the Shadow Sphere) that corresponds to the Light Point is also highlighted in red and will automatically move when the Light Point is moved.

If the Light Point is positioned at the middle of the sphere, this would indicate a light being placed directly above the effect. From this position, you will see very little shadowing as overhead lights do not cast shadows and will remove most of the shadowing from an effect. Lights only cast shadows when they are set directly above from various angles. The more severe the angle (closer to the edges of the Light Sphere), the darker the image will become. You can lessen this by adjusting the Light Color Slider to reduce the Opacity of the light being cast on the effect. To increase overall lighting, increase the Ambient Lighting slider settings.

Spotlight Checkbox
Check this option on to convert the selected Light Point into a Spot Light Point. Spot Lights cast soft circular shapes of light directly over the graphic and help you shade it. Use Feather, Spotlight Size and Light Color controls to enhance a Spot Light Point.

Feather
This slider will control the softness of the spotlight. Lower settings make the spotlight harsher and more intense looking. Higher slider settings give a softer look and spread the light out in a more graduated manner.

Spotlight Size
This slider controls how large a circumference the spotlight will spread out to cover the area it is centered on.

Light Color / Opacity
This slider controls the color and opacity of the light that is emitted by the currently selected Light Point. The lower the opacity, the more the light fades into the artwork it shines upon and is less visible. The Light Color button at the end of the slider gives you access to a color picker, so you can choose the color tint of the light.

Ambient Light
This slider controls the strength of the ambient light that is reflecting around the effect. Ambient light does not come from any source or direction but represents reflected light from existing sources. The Ambient Color button at the end of the slider allows you pick the color tint for this as well.

Glare Strength
This slider controls how much glare is generated for effects that have lighting directly over them. The glare that is cast back from the effect when the light strikes is controlled by this slider. Reducing the Glare Strength setting reduces the amount of glare that you see when the light is positioned over or above and effect.

 
TutorialsHome
 

By Joe Cilinceon, © July 24, 2002