
|
| |
|
The Focus filter is part of the DreamSuite 1 Set.
It allows you to apply soft focus, procedural focus, in-motion focus and fading-depth focal effects to your
images.
NOTE: The following tutorial covers just the controls or click on the example below for tips
on how I got the effect.
|
| |
 |
|
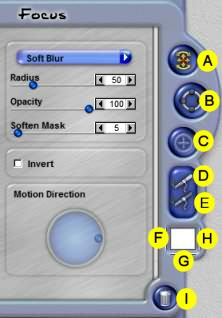
A. Transform Focus Ellipse
This tool allows you to move the Focus Ellipse by clicking over the center and dragging it.
- To rotate the direction of the focus, place the cursor just outside the Ellipse, and you will be given
rotational control.
- To make the Focus Ellipse angle at a perspective, adjust the out path inward to shape the focus into an
oval.
- Adjust the inner Ellipse path to expand or contract the focus area.
B. Create Focus Ellipse
This tool is used to create a new Focus Ellipse. Click on screen, and a new Ellipse is generated under the
cursor. With multiple Ellipses, you can have multiple focus points.
C. Focal Center Point
When the Focus Type is set to either Zoom or Radial, this tool allows you to click on screen to set the center
point of the focus. You can click anywhere on the screen to move it or drag the point to a new location. This
tool is only available when the Focus type is Zoom or Radial.
|
|
D. Remove Out of Focus Areas Brush
This brush tool allows you to selectively remove areas that are out of focus and, bring them into focus. Use
Brush Opacity and Feather controls, to set how strong the adjustment is, and how smoothly it blends.
E. Add Out of Focus Area Brush
This brush allows you to selectively add areas that are out of focus. Use the Brush Opacity and Feather controls
to set how strong the adjustments are and the amount of blend you want.
F. Brush Opacity
Click on this small vertical slider to access the brush size control. As you adjust the feather control,
you will be shown the brush attributes window. This window displays the actual size, opacity and feather
settings of the brush as they will be applied.
|
|
G. Brush Size
Click on this small horizontal slider to access the brush size control. As you adjust the size, you will see a
brush settings windows with the actual size, opacity and feather
settings of the brush as they will be applied.
H. Brush Feather
Click on this small vertical slider to access the brush feather control. As you adjust the size, you will see a
brush settings windows with the actual size, opacity and feather
settings of the brush as they will be applied.
I. Delete Tool
This tool is used to delete effects, paths and ellipses. Select this tool and then click over the item you want
to delete. When this tool is active, you are shown all effects ellipses and paths from all tools you have used.
|
| |
|
Click on Right arrow below for page 2.
|
| |
  
|
| |
|
By Joe Cilinceon, © July 25, 2002
|