DS
 

Crystal Painter page 2.


Edge Radius
This slider adjusts the angle and sharpness of the bevel edge. Use this control with Polish Curvature and Bevel Depth sliders to refine the look of the depth effect.

Depth
This slider changes the height of the bevel. Stronger settings make the bevel appear to have more height and depth. Use this control with the Edge Radius and Polish Curvature sliders to refine the look of the depth effect.

Refractive
This slider is used to pull the image into the depth to refract it inside the bevel shape. Typically lower settings with this slider yield the best results.

Polish Curvature
This slider rounds and smoothes the angles of the bevel, making them softer with gentle curves versus sharp angles. Use this control with the Edge Radius and Bevel Depth sliders to refine the look of the depth effect.

Add Image Color Brush
Use this brush to paint under the gel and onto the background. The brush applies a color that is shown through the gel. You will see how the Gel depth will bend and refract the colors into the depth of the effect. If you want to apply the gel to just the area beneath the selection, uncheck the Apply Background Image option, and the Gel will be contained inside the selected areas. Use the brush controls to define the opacity, size and feather of this brush. You should note that as the color is applied under the gel effect, it will change in appearance as if it were seen through a colored piece of glass. Some experimentation may be required to get the desired color due to the photo-realistic nature of how this effect is generated.

Crystal Painter Controls

Remove Image Color Brush (Red Brush)
Use this brush to remove any paint you have applied using the Add Image Color Brush tool. It will remove the areas you brush over. Use the brush controls to define the opacity, size and feather of this brush.

Image Color
The Image Brush color and opacity is set with this control. Lower slider settings apply less of the color, while higher settings apply more of the selected color. Use the color box adjacent to the slider to define the color. Click on the color chip, and the color picker will appear.

Add Surface Color Brush (Green Brush)
Use this brush to paint onto the surface of the gel. The brush applies a color that is shown on top of the gel. You will see the color bend with the curvature of the depth from the surface as the bevel shapes the depth. If you want to apply the gel to just the gel selection, uncheck the Apply Background Image option, and the Gel will be contained inside the selected areas. Use the brush controls to define the opacity, size and feather of this brush. You should note that as the color is applied on the surface of the gel effect, it will change in appearance as it mixes with the color of the gel surface.

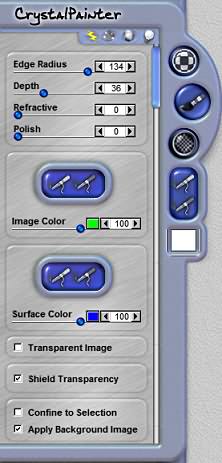
Remove Surface Color Brush (Red Brush)
Use this brush to remove any paint you have applied using the Add Surface Color Brush tool. It will remove the areas you brush over. Use the brush controls to define the opacity, size and feather of this brush.

Surface Color
The Surface Color Brush color and opacity is set with this control. Lower slider settings apply less of the color, while higher settings apply more of the selected color. Use the color box adjacent to the slider to define the color. Click on the color chip, and the color picker will appear.

Transparent Image Checkbox
If this is checked, it will treat the artwork as if it were a transparent selection. This is useful if you have type on a layer and desire to use the shape of the type, but avoid using the color (black type, for example, will influence the color of the gel that is on top of it).

Shield Transparency Checkbox
When this option is checked, the effect will only apply to the pixels on the layer and will not affect the transparent areas. Checking this option will change how DreamSuite applies the effect around a selection or on artwork on a layer.

Confine to Selection
When this is checked, it forces the effect to confine changes to the selection. To allow the effect to apply to the entire image area and not just the selection, you must uncheck this box. This option is only available if your image has a selection.

Apply Background Image Checkbox
When this option is checked, the background image behind the selection will show up in the preview and will also apply as part of the effect.

 
Back to Page 1HomeTutorials
 

By Joe Cilinceon, © August 1, 2002