Frames are easy enough with Blade Pro, it's built in beveling process makes it a snap! With your favorite presets, you can give all your images beautiful textured frames.
Now we are going to see how to give you even MORE options by using masks and Blade Pro to do some fast fancy frames!
|
|
|
|
| For this project I have included zip files of masks and
presets. The process can be easily duplicated with any frame masks and any
presets you like, but you can get the exact effect using mine. Help yourself!
The presets are my own, but the masks came from a giant masks folder I got somewhere, if
the author would like credit, please let me know! P.S. All children on this page belong to me, except for my niece and her dog, and I am publicly giving my brother and sister-in-law credit for her. To install the masks, put a Masks folder in your Paint Shop Pro program folder, on the same level as the Tubes Folder. Download the zip files. Unzip the Masks zip file to the Masks folder. Unzip the Presets zip for to your Environments and Textures folder of Blade Pro.
|
|
|
|
| Begin by opening your image you wish to frame in Paint Shop Pro. Add
a new layer and floodfill it with white. Make sure this layer is active, go to Blade
Pro and apply the preset of your choice. Above I have used sbl-chasedgold. Keeping this layer as the active layer, go to Masks, Load from Disk and navigate to Alhambra.msk. Apply this mask, you should have a lovely filigree look on the photo now!
Merge the layers. Set the foreground color to a light yellow and the background color to white. Go to Image, Borders, check symmetric and set the value to 25. Apply this white border. Click on the white border with the Magic Wand and then go to Selections, Invert. Go to Image, Effects, Drop Shadow and add a black drop shadow, opacity 50, blur 5, offsets of 2. Go to Selections, Select None. Reverse the colors in the color picker so that the yellow is now your background color. Apply a symmetrical border with a value of 10. Click in this yellow border with the Magic Wand so that the border is selected. Go to Blade Pro, apply the chased gold preset. VOILA!
|
|
|
|
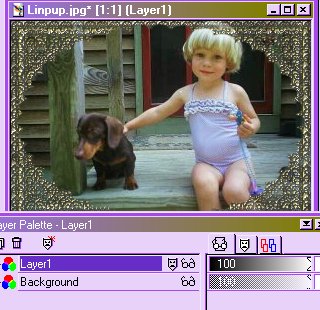
| The frame above is made by opening the image you want framed, and applying a white border with a value of 30 to that layer. Duplicate that layer, make sure the duplicate is the active layer, and turn off the layer view on the background layer by clicking on the little eyeglasses.. Click in the white border with the Magic Wand to select only the border. Apply Blade Pro preset sbl-rainbowmosaic. With the border still selected, go to Masks, Load from Disk, and navigate to 1alaceyside.msk. Apply the mask. If you would like the frame colors a little darker or brighter, you can apply the preset again, over the mask, on the same layer. Invert the selection and with the eraser, clean up any stray pixels inside the frame. Invert the selection again. Go to Image, Effects, Drop Shadow and apply a shadow color of black, opacity 100, blur 5, offsets of -1. Activate the background layer again and turn on the layer view by clicking on the red X on the eyeglasses. Merge the layers and save the image!
|
|
|
|
|
| The graphics and text on this site are copyrighted by me, unless otherwise noted. Please do not take any images or text, without my written permission, unless it is specifically made available within this site for download. © 1999 dizteq |
|